Sunday, November 27, 2011

Nov Art Bead Scene Entry

I am a huge fan of the Art Bead Scene blog and the designers.  This month I decided to take the challange and try to produce a piece inspired by the work Madonna Pietra degli Scrovigni by Marie Spartali Stillman.  This piece inspired me to make a transfer art bead for a bracelet.  So using a sheet of pearl Premo polymer and a color print of a romantized lady I proceeded with the transfer bead:


Here is the transfer on the sheet of clay ready to be made into an art bead:


Here is the bead, cured with eyelets inserted in the drilled holes:


Keeping with the color scheme of the artist I used pearls, crystals and glass beads in the bracelet with a curved hook clasp.  Here is the finished piece:


The piece will be donated to the North West Polymer Clay Guild (NWPCG) for the Christmas party fun.  Hope you can come !!!

Sunday, October 30, 2011

Using the Rivet tool with polymer pendants

I love the finished look that a brass eyelet gives my polymer pendants:


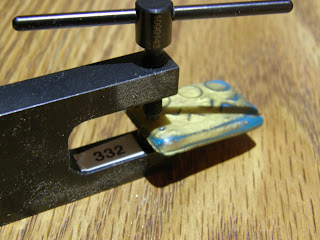
I use the Rivet Tool from Crafted Findings. 
The items needed are:

Vise
3/32 Brass Tubing from hardware or hobby store
Crafted Findings Long Reach Rivet with 3/32 eyelet flaring tool
Jewelers saw
Polymer pendant with hole slightly smaller than 3/32


Drill the hole in the pendant


 Place the pendant on the brass tubing that is securely held by the vise:


Cut the brass tubing to the exact length needed for the polymer pendant using a jewelers saw.  Leave enough of the tubing to flare on either side of the pendant:


Here's another view:


Make sure to keep the piece of tubing in the polymer piece


Place the piece in the Riveting Tool.  This is awkward at first but once you get the hang of it, it gets easier.


Another view


Twist the eyelet flaring handle to flare the tube


And then you have a brass lined hole in your pendant:


This is the back


Finished piece example: